Showing posts with label Writing Tutorial. Show all posts

Tuesday, February 11, 2014

Wifi রিসিভার দিয়েই শেয়ার করুন ইন্টারনেট! একসাথেই ব্যবহার করুন মোবাইল, ল্যাপটপ অথবা কম্পিউটার ইন্টারনেট

ডেস্কটপে ওয়াই-ফাই নেট কানেক্ট করার জন্য ওয়াই-ফাই রিসিভারের প্রয়োজন হয়। ল্যাপটপে সাধারণত বিল্ড ইন ওয়াই-ফাই রিসিভার দেয়াই থাকে। ফলে খুব সহজেই ওয়াই-ফাই ইন্টারনেট কানেক্ট করে ব্রাউজ করা যায়। যেহেতু ডেস্কটপে রিসিভার থাকে না তাই আলাদা রিসিভার লাগিয়ে নিতে হয়।
রিসিভারের কাজ হচ্ছে ওয়াই-ফাই ইন্টারনেট কানেক্ট করা কিন্তু একটা সফটওয়্যারের সাহায্য ইচ্ছে করলে রিসিভার কে রাউটার হিসেবে ব্যবহার করা যায়। অর্থাৎ ডেস্কটপ থেকে ইন্টারনেট শেয়ার করা যাবে। শেয়ার করা সেই নেট মোবাইলে ওয়াই-ফাইয়ের মাধ্যমে বা ল্যাপটপেও ওয়াই-ফাইয়ের মাধ্যমে ইন্টারনেট ব্যবহার করা যাবে।

Virtual Router Plus নামের ফ্রী এবং ওপেন সোর্স এই সফটওয়্যারের মাধ্যমে খুব সহজেই ওয়াই-ফাই হটস্পট তৈরি করা যায়। উইন্ডোজ ৭ এবং উইন্ডোজ ৮ এ এই সফটওয়্যার সাপোর্ট করে। চমৎকার এই ছোট সফটওয়্যারের সাইজ মাত্র ১৫০ কিলোবাইট। ব্যবহার করা খুবই সহজ। ইন্সটলের প্রয়োজন নেই। ওপেন করে নাম আর পাসওয়ার্ড দিয়ে Start Virtual Router Plus এ ক্লিক করলেই চালু হয়ে যাবে।বিস্তারিত জানতে দেখতে পারেন এই ভিডিও
Youtube

ডাউনলোড লিঙ্কঃ

Virtual Router Plus
ডেস্কটপের জন্য অনেক ধরনের ওয়ারল্যাস এডাপটার পাওয়া যায়। USB এডাপটার বা রিসিভার বেশ কম দামেই পাওয়া যায় বাংলাদেশে। যারা ডেস্কটপ থেকে ইন্টারনেট শেয়ার করতে চান তারা এই এডাপটার কিনতে পারেন। দাম ৯০০টাকা হবে। মডেল হচ্ছে
150Mbps Wireless N USB Adapter TL-WN727N


If you face any problem in this post please let me know your problem. To inform your problem you can leave a comment below. And if you like my post please click the Facebook like button or spread this post by clicking the Twitter, Facebook etc. icons below. Because, it will be a great support for me.
Monday, February 10, 2014

unloack করে নিন মডেম আর যেকোন অপারেটর এর সিম ব্যাবহার করুন

modem unloacker,মডেম আনলকার
আমাদের কাছে যে পরিমান সিম কার্ড আছে সেই পরিমান মডেম নাই অনেকের। মানে বলতে চাচ্ছি আমাদের সবার কাছেই মনে হয় বাংলাদেশের বেশির ভাগ মোবাইল অপারেটর এর সিম আছে। কিন্তু সবার কাছে সব কম্পানির মডেম নাই। সাধারনত সিম অপারেটর কম্পানি গুলো যে মডেম দেয় সেগুলো থাকে লক করা। মানে ঐ বেটাদের মডেমে অন্য কম্পানির সিম কার্ড দিয়া কাজ চলে না সেই ব্যাবস্থা করে দেয়।
আসুন দেখি কিভাবে আনলক করা যায় এসব মডম। নিচের নিঙ্ক থেকে ছোট্ট সফটওয়্যার টি নামিয়ে নিন, আর মনের আনন্দে ব্যাবহার করুন এক মডেম দিয়েই সব অপারেটর এর সার্ভিস।Download করুন ফাইল টি rar ফাইল হিসেবে আছে। প্রথমে এক্সট্রাক্ট করুন। তারপর স্বাভাবিক নিয়মে ইন্সটল করুন।
আসুন দেখে নেই সফটওয়্যার এর বৈশিষ্
নামঃ Dc Unloaker
সাইজঃ ২.৮৯ মেগা
এই modem unloacker টি যে সমস্ত ডিভাইস সাপোর্ট করবেঃ
Huawei datacards,Huawei phones,Longcheer,Maxon,Micromax,
MYWAVE,Novatel,ONDA,Option,
SierraWireless,SkypePhone AMOI,ZTE datacards


ব্যাবহার পদ্ধতি দেখে নিতে পারেনঃ
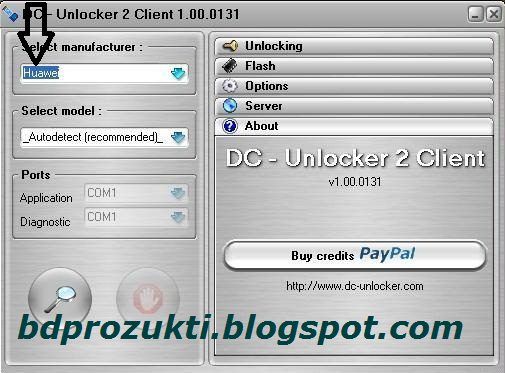
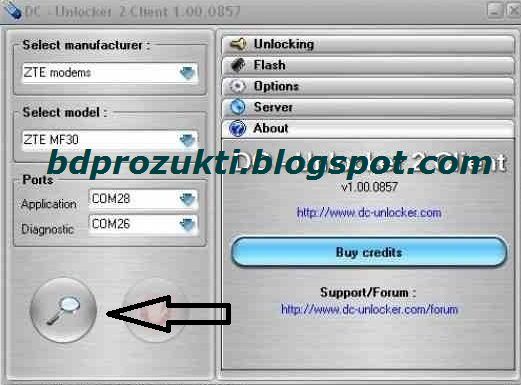
ইন্সটল করার পর modem unloacker টি রান করান, নিচের চিত্রের মত পাবেন। সেখান থেকে আপনার মডেম এর ব্রেন্ড এর নাম সিলেক্ট করে দিন।


modem unloacker,মডেম আনলকার
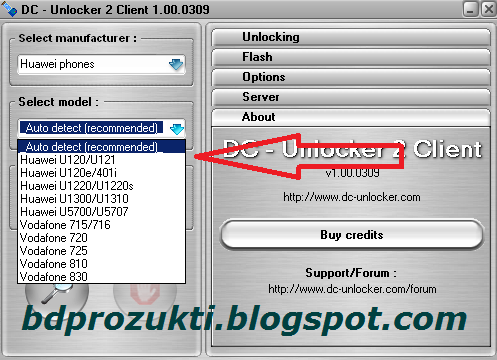
সিলেক্ট মডেম এর স্থানে আপনার মডেম বাছাই করে দিন। নিচের চিত্রে দেখুনmodem unloacker,মডেম আনলকার
নিচের চিত্রের মত দেখানো সার্চ বাটনে ক্লিক করুন
modem unloacker,মডেম আনলকার
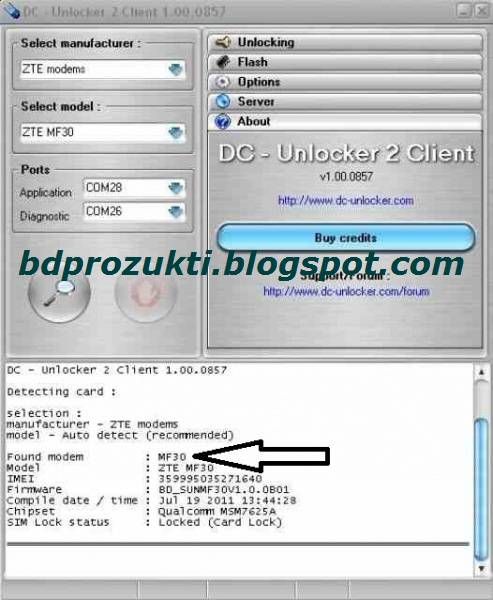
আপনার মডেম পেলে নিচের চিত্রের মত ইনফো দেখাবে
modem unloacker,মডেম আনলকার
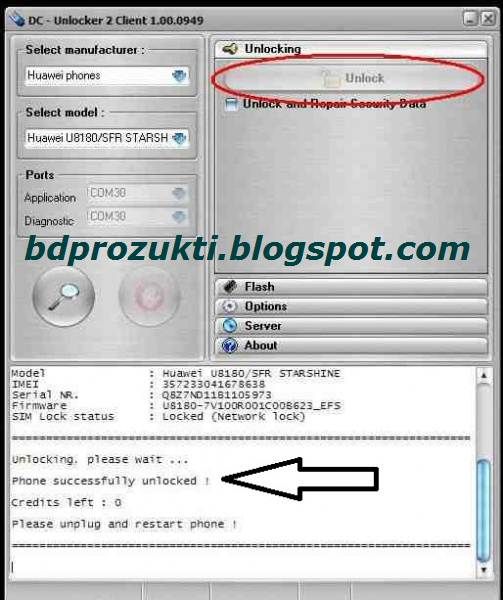
এবার নিচের চিত্রের মত, unloacking অপশনে unloack বাটনে ক্লিক করুন।
modem unloacker,মডেম আনলকার
আপনার কাজ শেষ এবার ইচ্ছা মত যেকোন অপারেটর এর সিম ব্যাবহার করুন।


If you face any problem in this post please let me know your problem. To inform your problem you can leave a comment below. And if you like my post please click the Facebook like button or spread this post by clicking the Twitter, Facebook etc. icons below. Because, it will be a great support for me.
Tuesday, January 31, 2012

Photoshop Japanese foliage brushes

CLICK TO DOWNLOAD THIS ITEM


Name: Photoshop Japanese foliage brushes

Size: 170.94KB

Formed: ZIP


If you face any problem in this post please let me know your problem. To inform your problem you can leave a comment below. And if you like my post please click the Facebook like button or spread this post by clicking the Twitter, Facebook etc. icons below. Because, it will be a great support for me.
Photoshop Vector Brushes

DOWNLOAD PHOTOSHOP VICTOR BRUSHES


Name: Photoshop Vector Brushes

Size: 504.11KB

Formed: ZIP


If you face any problem in this post please let me know your problem. To inform your problem you can leave a comment below. And if you like my post please click the Facebook like button or spread this post by clicking the Twitter, Facebook etc. icons below. Because, it will be a great support for me.
Photoshop Water Brushes

DOWNLOAD PHOTOSHOP WATER BRUSHES.


Name: Water Brushes

Size: 318KB

Formed: ZIP


If you face any problem in this post please let me know your problem. To inform your problem you can leave a comment below. And if you like my post please click the Facebook like button or spread this post by clicking the Twitter, Facebook etc. icons below. Because, it will be a great support for me.
Use of Selective Desaturation effect in Photoshop

Learn Photoshop while creating Desaturation effect with this tutorial, written with beginners in mind but great for all skill levels.


Step 1:
Open up your image that you would like to use. I searched my mobile phone gallery and i found this picture-


Step 2:
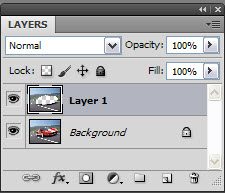
Duplicate the layer (Ctrl + J) and go to Image > Adjustments > Desaturate (Shift+Ctrl+U)


Step 3:
Now we have a black and white picture-


Step 4:
Take out your History Brush tool, and start erasing on your picture. Feel free to zoom in, this will make it a lot easier

Now start erasing the parts on your flower you would like to have in color like the example below


And that’s basicly it. My final result


If you face any problem in this post please let me know your problem. To inform your problem you can leave a comment below. And if you like my post please click the Facebook like button or spread this post by clicking the Twitter, Facebook etc. icons below. Because, it will be a great support for me.

Create High Speed Motion Effect In Photoshop

In this tutorial, we’ll learn how to add High speed motion effect in a picture using blur motion photoshop effect. High speed motion is very much popular in sports photography.
Also you can use this effect where people dancing in a party or any image where the subject should appear to be moving.


I am working in Photoshop CS5.1 extended but you can create this effect in any virsion of photoshop.


1.At first choose your photo and open it into photoshop.


2.Using Magnetic Lasso Tool create a selection over the subject that you want to be moving. After this Press (Ctrl+shift+I). Check this image.


3.From the main menu choose Layer>New>Layer via Copy (Ctrl+J)


 4.Now go to Filter>Blur>motion Blur


 5. Set the angle to “5″ and Distance to “64″ then press ok.


 Thats All. This is the final image of this project.


If you face any problem in this post please let me know your problem. To inform your problem you can leave a comment below. And if you like my post please click the Facebook like button or spread this post by clicking the Twitter, Facebook etc. icons below. Because, it will be a great support for me.

Create a Wild Fire Text Effect

Fire text is one of the most classic technique that you can see in Photoshop tutorials. I am trying out another version here using some real fire images, mix with filters and blending methods. Here we go..


Create a document of a reasonable large size with black background. Using Type tool, with size 280pt and Trajan Pro font, type a number “1″.

Right-click on the type and choose Blending Options. Check on Outer Glow and key in the following settings.


Check on Color Overlay and key in the following settings.


Check on Satin and key in the following settings.


Check on Inner Glow and key in the following settings.


Right-click on your type layer again and choose Rasterize. Using the Eraser tool with size 200px, fade off the top portion of the type.


Go to Filter > Liquify. Select the Forward Warp Tool and key in the following settings. Using the Forward Warp tool, create some waves on the border of the type.


Download the free Fire image from >>>HERE<<<. Go to Channels tab and select the Green layer. Ctrl + left click on the Green layer to load selection of the highlight areas.


Go back to Layers tab and use the Move Tool to drag any part of the selected area into the document with the “1″ you done earlier. Place the fire above the type.


Using the Eraser tool with 15px, erase all the excessive fire, leaving only those parts that is waving around the type.


Duplicate the fire layer. Set the Opacity of the original fire to 30%. Set the Blend Mode of duplicated fire to Overlay.


Repeat the processes to cover the type with more flames. And there you got your first flaming type!


Create more flaming letters according to your own preferences like this-


Download Premade Background from >>>HERE<<<. Resize and place the image into the document as shown below.


And thats all,  I will love and appreciate if you post a link to this tutorial on your site to share with your readers. Thank you...


If you face any problem in this post please let me know your problem. To inform your problem you can leave a comment below. And if you like my post please click the Facebook like button or spread this post by clicking the Twitter, Facebook etc. icons below. Because, it will be a great support for me.

Change Your Hair Color in Photoshop

In this Photoshop tutorial we are going to learn how to change anyone’s hair colour in ten steps. It can be very useful to adding coolness into your photos. Lets check your and other celebrities pictures,how they look with a different color. Ok friends lets go


Step 1
Choose ur photo and open it in photoshop.


Step 2
2. Create a new hue/saturation adjustment layer.


Step 3
Set the saturation to “-100”, Hue to “-6″ and lightness to “+51”. This will turn the photo into faded black and white look.


Step 4
Now mask out the hair from the base photo. Choose brush tool and start painting the hair area with black color using a soft edge brush.


Step 5
Now go to Image>Adjustments>Invert(Ctrl+I).

Step 6
The hair is now grey in color and the rest of the image is back to normal.


Step 7
Double click on this icon and the Hue/Saturation window will pop up.


Step 8
Now set the adjustment Hue to”-39″ saturation to “72″ and lightness to 7. But you change hair color as you like.


Step 9
To touch up the edge details, we can use a soft edge brush to paint the over ran areas with black color.


Step 10
Finally we go to Filter>Blur>Gaussian Blur and give a value of “2.5” to further soften the mask’s edges.

 And


Final Image


And this is the final result.I hope you will have fun with this little tutorial.
Try it now :)


If you face any problem in this post please let me know your problem. To inform your problem you can leave a comment below. And if you like my post please click the Facebook like button or spread this post by clicking the Twitter, Facebook etc. icons below. Because, it will be a great support for me.